Showing posts with label writing an adventure game. Show all posts

Hacking a JavaScript text adventure game 05

<< First  < Previous

Continuing with our short series on creating a JavaScript adventure game.  Today we will look at creating a few more features and put them all together into a longer demo.

1. Download the files
2. The CSS
3. Adding reminders
4. "The Astonishing Cave of Unimaginable Horror."

1. Download the files

You will need a copy of three files to use this example.  Download now.

The files are:
index.html (this is the code for the main page)
flags.json (this code keeps track of the various flags used in the game)
script.json (this code keeps all of the adventure game - the options and paragraphs of text).


2. The CSS

We first looked at the CSS in the third post.  In this version I have added some more CSS rules to make the adventure game look at little better.

The adventure game running in Microsoft's Edge browser.

This is intended to be an example only.  I am no self-confessed expert at CSS and you will no doubt want to experiment with the CSS code to make it look exactly as you want, however you will agree that it looks a lot better for the face lift.


3. Adding reminders

I thought that it would be useful to have reminders appear on screen to help you remember whether you have found certain items or not.  For example, in this demo game you can find a (somewhat useless) key.

The first step in this process was to record some new attributes for each flag.  Open the flags.json file and take a look.


Each flag now has a 'show'attribute.  If the value is set to 'true' then the description will be displayed on the right-hand-side of the screen.  Furthermore when you hover over the description a longer description held in 'text' will appear as a hint.  Some flags are used to control whether the play has already completed an action (so that option is not given again) and so not all the flags should be displayed in the reminders.

The JavaScript code to make this work looks like this:


It starts on line 148, and it does the following:

Create a new list of reminders.
For each flag:
    If the flag is on and the flag should be displayed
        Add the description to the list
        Add the 'text' as hover text
Put the new list into the html of the thing called 'infoContainer'. (You can see infoContainer on line 176)


4. The Astonishing Cave of Unimaginable Horror

The demo adventure is rather short, but it does show off all of the things that you can do using this code.

The adventure starts at the bottom of a deep hole.

Not much to do here other than accept your fate and press 'OK' (it's a bit like downloading Windows 10 updates in that respect)

Shortly you are given some options:

By investigating the running water you will discover that you are at the bottom of a wishing well.  There is some gold you can grab here, but once you have this option shouldn't be presented again.  Notice how there is a flag that will prevent this option being displayed again.

Soon you find an object...

By searching the unfortunate victim from a little earlier on you will discover a bronze key.   Notice how we set a flag to appear as a 'reminder'.  Also, the option to try the bronze key in the iron padlock is now displayed.  Try to visit this location without the key - the option will not be given.


Actually, the bronze key is not the correct key for the iron padlock (presumably you need an iron key?) and the key will get stuck. Line 108 in the script.json file controls this behaviour:

Trying the wrong key in the lock is not a good plan.  When you do flag 3 (the key) is turned off.  You should see that the key is removed from your list of objects in the 'reminders' section.

The code for turning flags off is dealt with on line 92 in index.html.


Well that's enough for now.  Maybe I will continue with this series in the future and add a few more features - such as a combat system for dealing with the sleeping beastie to the west.

For now, I hope you enjoyed this brief JavaScript tutorial and you found it easy enough to create your own games.


Bored already?

You might like to play a longer JavaScript adventure game - see Have Spell will Travel, or read all about it on this blog.

Before I go I should point out that the images used in this tutorial come from the brilliant duoLorc Delapuite from Game Icons

Hacking a JavaScript text adventure game 4

<< First < Previous

Continuing our JavaScript adventure game series.  Today we will add a scoring system.

1. Downloading the files
2. Adding the scoring system

1. Downloading the files
You will need a copy of three files to use this example.  Download now.

The files are:
index.html (this is the code for the main page)
flags.json (this code keeps track of the various flags used in the game)
script.json (this code keeps all of the adventure game - the options and paragraphs of text).

2. Adding the scoring system

We are going to add a scoring system so reading certain paragraphs will reward you will points.


Here we have added a 'Gold' counter to keep track of the score, but this could really be anything, and of course, the counter could count up or down, and you could have multiple counters if this makes sense in your game.


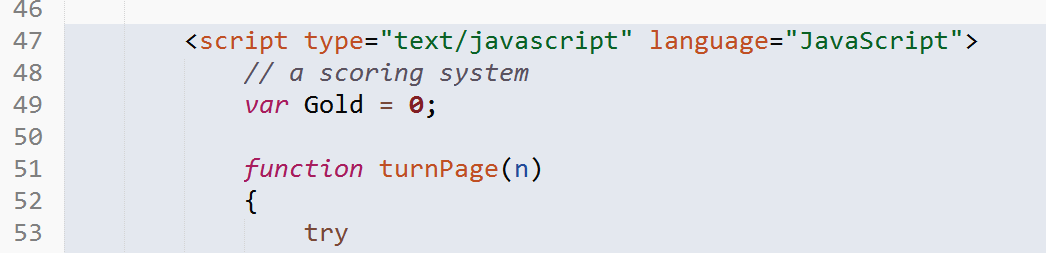
Here on line 49 we've added a new variable to keep track of the 'Gold'.  It starts at 0.


Line 61 adds the gold found at a location to the current score.  Note that this will run every time you visit a location whether you intend to or not.  Currently the game cannot detect whether you have visited a location before or not.


Here I have gone into the script file and added a new attribute for each location.  Each location now has an amount of gold associated with it.  Notice that this is used on line 61 of the main program?


Line 64 changed so that the current gold value is displayed onscreen under the title.


A little CSS to make things look a little nicer.


That's all for today. - Next time we'll make a longer example program; add some more CSS to make things pretty and have some reminders so you know what objects you have found so far.  See you there.

Hacking a JavaScript text adventure game 3

<< First < Previous

In this post we will look at the adventure game code in more detail.

1. Downloading the files
2. The code in detail

1. Downloading the files

You will need some files to play with.  You can download them here.
The files are:
index.html (this is the code for the main page)
flags.json (this code keeps track of the various flags used in the game)
script.json (this code keeps all of the adventure game - the options and paragraphs of text).

2. The code in detail


The start of the code just sets up the html file.  The <title> tag lets you tell your browser what to call your game. Go ahead and change it.  You should notice that your browser tab has changed.  If it doesn't work make sure you saved your code and try again.  The <meta> tags are used by your browser and search engines.  We don't really need these as the code isn't online (yet).


These two lines tell your JavaScript program to load the two *.json files into memory.  Your JavaScript will now have two lists, one called script and the other called flag.  You can refer to any of the items in this list using the index notation: for example script[1].title refers to the title of the second script.  In my file with has a value of "A key!".


This section is called the CSS (Cascading Style Sheet).  We could have put this in a separate file if we wanted.  The CSS tells the browser how to display the various html in our page.  For example, the first two lines tell the browser to display the body of the page in black with a font colour of white.  Notice that you must use the American (incorrect) spelling of 'color'.  You can read more about CSS on w3schools.com.

Notice the full stops before the things in green?  These refer to anything in the html code that has a class name.  For example, whenever we put an image into a location we use an image of class "locationImage".  The CSS rule here is to have a solid border.

You will also notice that there is no CSS for the class "inGameHeading".  Try adding some rules here to change the style of the paragraph headings.


This line of code tells the browser that the next part of the file is some JavaScript.  Remember - JavaScript is a scripting language that lets you change the html on a page in response to the user's actions.  In our case, whenever the user presses a link we want the page to put new paragraphs, options and images onto the page.


Inside our JavaScript section we have added a function - turnPage().  This function has the job of putting a new location in the game on the screen.  This function is invoked every time the user presses one of the options.  The function starts with a curly brace { on line 45 and ends with a curly brace } on line 101.

Notice that the function has a letter 'n' after function turnPage( ?
This variable is called a parameter.  Whenever you invoke the turnPage function, you must tell it which location to 'turn to'.  Remember that the first location in the script file is 0.  This is why line 100 reads:

onClick='turnPage(0)'

It means: 'click this and turn to the first location'.

Next, the function will try to put the new location on the screen.

line 55: It puts the new location's title into a variable called 'newtitle'.
line 57: It puts the new description into a variable called 'newcontent'.
line 59: It puts the new image into a variable called 'newimage'.

Putting the links in are a little trickier...


Lines 64 - 89 deal with putting the links in.  Remember that it is possible for a link to appear and disappear depending on whether an action has been completed or not.

For each link in the list of links for any location this code checks whether the link should be displayed or not (depending on the value of the flag it points to).


Once the new html for the title, paragraph content, links and images have been created, these lines of code put the new html onto the page.

For example, line 97 literally means: "Find the thing in the document called 'titleContainer' and change its html so is equal to this thing in my variable 'newtitle'.

Once this has been completed the function has done its job and we can close our JavaScript section.


This last bit of code defines our html page.  Everything between the <body> and </body> are part of the page.  All our JavaScript function does is changes the contents of these four divs so that they are the new information from the script file.


And that brings us to the end of this sections.  Come back soon and we will have more functionality.

Hacking a JavaScript text adventure game 2

<< First post

Following on with our series on hacking a JavaScript adventure game.  Today we will look at how to add images for each location in the game.

1. Download the files
2. Adding images

1. Download the files

You will need a copy of three files to use this example.  Download here.

The files are:
index.html (this is the code for the main page)
flags.json (this code keeps track of the various flags used in the game; more on this later)
script.json (this code keeps all of the adventure game - the options and paragraphs of text).


2. Adding images

First I am going to create a folder to store all my images in my project.  Make sure you put this folder in the same location as your project files!  It is a common mistake to put your images in "my documents" or "my pictures".

I have created a new folder called 'images' to store the images I will use in the project.

You can call your folder whatever you like, however 'images' works for this example.  If you change it then you will have to change the code as well!

Now I have found a couple of images that I like and so I will add them into my images folder.

Once I have the files in the right folder I will go into the code and tell each location to display the appropriate image.

Here I have added images called "door.png" and "bronzekey.png" into the locations script.

The next step is to change the JavaScript so that it displays the correct image for each location.

Paragraphs with an image.

This is done with the following lines of code:

From line 59:


What this line of code does is to create a new image tag with a width and height of 200 pixels.  It looks inside the script for the current image for this location.

The image is actually put onto the screen with line 100:

document.getElementById("imageContainer").innerHTML = newimage;

Which means 'go and find the thing called 'imageContainer' and change its html so that it is the same as what is written in the variable 'newimage' (from line 59).

Now that we have written this code we don't have to change the code any further.  Adding more images for new paragraphs is as simple as setting the "image" attribute in the script file.

Next time we will look at the code in more depth.

Hacking a JavaScript text adventure game 1

Here we look at how to create a simple JavaScript adventure game for students new to JavaScript.

1. What is a text adventure game?
2. What is JavaScript?
3. Getting started
4. Explaining the code
5. What's next?

1. What is a text adventure game?

In our example we will create an adventure game in which you are presented with a series of choices. By clicking on the choice you want you will proceed to new sections of the game.  The format is similar to the awesome Fighting Fantasy series of games.  In our example we will allow options to be presented to the player only if specific tasks have been completed, or hidden from the player if a task has already been completed.  In this way we can create simple puzzles.

2. What is JavaScript?

JavaScript is the language of your web browser.  It allows web pages to be interactive.  Head over to w3schools.com for a full course on web programming.  Thankfully JavaScript is really easy to learn.

3. Getting started

You will need a copy of three files to use this example.  Download now.

The files are:
index.html (this is the code for the main page)
flags.json (this code keeps track of the various flags used in the game; more on this later)
script.json (this code keeps all of the adventure game - the options and paragraphs of text).


You will need a text editor program to use the files. I use Sublime text, but Notepad++ will work just as well.  The notepad that comes with your operating system will work, but it wont have some of the 'bells and whistles' that the others have.

4. Explaining the code

In the adventure game you will get a series of paragraphs and options. By clicking the options you will be sent to new sections of the game.  In this way we can create simple puzzles.  The flow of the game is controlled by 'flags'.  Flags start in the 'off' position and can be turned 'on' by visiting certain locations in the game. Flags are used to keep track of the events, in this example - have you found the key?


  • Run the index.html file in your web browser (it should be as simple as clicking on the icon) and you should see something similar to the following:


A simple introduction to how it all works. Here we are at location '0'.  By clicking the link we are sent to location '1' where we find the key.  When we get back to location '0' you should see that this link has been replaced by another one allowing you to exit the room.  It is rather simple, but we have just solved our first puzzle,

In this example you need to find the key under the mat before you can open the door.  Notice that once you have found the key you are no longer offered the option to 'Check under the door mat', but instead a new option of 'open the door appears'.  This works because we use a flag to let the browser 'remember' that we have found the key already.


  • Open the file script.json in your editor.  It looks like this to me:
This file contains the information about the various locations in the adventure.  Yes, the adventure game is a bit boring right now, but this is just to show you what is going on.

The file contains two locations: "In the cell" and "A key!".  For hereafter we shall call this locations 0 and 1 respectfully.  Each location has some information associated with it.  First, a location must be contained within the open and close { } curly brackets.  Second, each location is separated with a comma:  { }, { } etc.  Each location has six properties:

  • title - this will appear on screen at the top of each paragraph.
  • content - this is a paragraph of text in html. You need the <p> and </p> tags to open and close the paragraph. You can have multiple paragraphs simply by having multiple tags "<p>para 1</p><p>para 2</p>" 
  • image - this is for displaying an image with each paragraph. We'll come to how to make this work in a later post.
  • turnFlagOn - this is a list of flags that will get switched on when you read this paragraph.  For example, if the list was "[2,4,5]", then flag 2, 4 and 5 will be switched to 'on' when this paragraph is read.
  • turnFlagOff - this is the opposite of the turnFlagOn property above, but it is reserved for a later post for simplicity.
  • urlink - this is the list of options for the current paragraph.  Each option has four parameters explained below.

Looking at the very first option for location 0, we have:

"urlink": [["Check under the door mat.", 1, -1, 0], ["Open the door", 2, 0, -1]],

This means that this location has two links - "Check under the door mat" (option 0) and "Open the door" (option 1).

Looking at option 0, we have the first item in the list is the text that will be displayed on screen.

The next value is '1'.  This means that successfully clicking on this link will send you to location 1 (we are currently at location 0).

The next value is -1.  This means 'ignore'.  If it was any other value it would point to a flag that must be switched on in order for the link to be displayed.  You can look at the list of flags in the flags.json file.

The final value is 0.  This means 'don't show this link if flag 0 is on'.  This is useful if you have completed a task and so you don't need that option anymore  (there is no point looking under the mat once you have found the key).

Now look at the second link "Open the door".  The numbers mean: "go to location 2 if you successfully click the link", but don't show this option until flag 0 is on.


  • Open the flags.json file.  It looks like this to me:

The contents of the flags.json file.
Each flag is like a switch.  It can be on or off (or more correctly true or false).  The "description" is not used by the program (yet) and is there to help you remember what each flag is for.

To add more flags, use the { } notation separated by commas.

5. What's next?

Start by trying to add new locations or changing the existing ones.  In future posts we will extend the game, add some images and explain some more of the code.
Writing an Adventure Game 09

Writing an Adventure Game 09

This shall be the last post in our series on writing an adventure game in BB4W.   Posts are getting rather long, and it really is over to you to complete the game now.  If you want an example of a more complicated adventure game engine, then do check out GOLIATH.

In this edit, we have added a procedure for allowing the apple in the woods to constantly grow back once it has been eaten (ultimately preventing the player from starving to death forever).  I've also added a cake object as a special gift for all my readers - enjoy!

Source code follows:

     REM an adventure game in BB4W
     REM by Mr Street

     REM version 1.0.0.1 setting up the world
     REM version 1.0.0.2 moving around the world
     REM version 1.0.0.3 fixing it so you can't walk out of the grid
     REM version 1.0.0.4 health decreases each turn (because you get hungry)
     REM version 1.0.0.5 set-up some objects for the player to interact with
     REM version 1.0.0.6 allowing objects to be picked up
     REM version 1.0.0.7 allowing obejcts to be dropped
     REM version 1.0.0.8 eating the apple
     REM version 1.0.0.9 the apple always grows in the woods.

     REM let's set up a 'world'
     
SIZE% = 3
     DIM World$( SIZE%, SIZE% ) : REM creates a 3x3 grid
     REM now 'populate' the grid with some space names
     
PROC_populateWorld
     REM now some data about our player
     REM player's starting position
     
x% = 2
     y% = 2
     REM player's health
     
health% = 50

     REM the objects
     
numObjects% = 3 : REM start with just a small number of objects
     
DIM prefix$( numObjects% )   : REM eg "a" or "an" or "the"
     
DIM object$( numObjects% )   : REM object name, eg "sword"
     
DIM objectx%( numObjects% )  : REM object x position
     
DIM objecty%( numObjects% )  : REM object y position
     
DIM edible%( numObjects% )   : REM set to -1 for an edible object, otherwise is 0

     
PROC_createObjects
     REM a list of objects that the player has
     
DIM playerObject%( numObjects% )
     REM the apple always grows in the woods
     
appleDelay% = 10
     PROC_main
     STOP


DEFPROC_main
     LOCAL command$ : REM user's input
     REM the main program
     REM repeat until the player is dead
     
REPEAT
       
REM show the player's current position
       
PROC_showCurrent
       REM show objects here
       
PROC_showObjects
       REM get some input from the player
       
PRINT REM a blank line
       
INPUT "What now? > " command$
       PRINT REM a blank line
       REM deal with user's input
       
PROC_executeCommand( command$ )
       REM the apple always grows in the woods
       
PROC_growApple
     UNTIL health% <= 0
     REM game over message
     
PRINT "GAME OVER!"
     ENDPROC

     
DEFPROC_executeCommand( command$ )
     REM deals with the users input
     
LOCAL com$, gridError$
     LOCAL ok% : REM checks whether the user's input is acceptable
     
ok% = TRUE REM assume user's input makes sense
     
gridError$ = "You can't go in that direction!" : REM a message for when you move off the grid
     
com$ = FN_convlc( command$ ) : REM convert to lowercase so it is easier

     
CASE TRUE OF
       WHEN 
com$ = "n" OR com$ = "north"
         IF y%<SIZE% THEN
           
y% += 1
         ELSE
           PRINT 
gridError$
           ok% = FALSE
         ENDIF

       WHEN 
com$ = "s" OR com$ = "south"
         IF y% >1 THEN
           
y% -= 1
         ELSE
           PRINT 
gridError$
           ok% = FALSE
         ENDIF

       WHEN 
com$ = "e" OR com$ = "east"
         IF x%<SIZE% THEN
           
x% += 1
         ELSE
           PRINT 
gridError$
           ok% = FALSE
         ENDIF

       WHEN 
com$ = "w" OR com$ = "west"
         IF x%>1 THEN
           
x% -= 1
         ELSE
           PRINT 
gridError$
           ok% = FALSE
         ENDIF

       WHEN LEFT$(
com$,3) = "get"
         thisObject$ = RIGHT$(com$, LEN(com$)-4)
         PROC_getObject( thisObject$ )

       WHEN LEFT$(com$,4) = "drop"
         thisObject$ = RIGHT$(com$, LEN(com$)-5)
         PROC_dropObject( thisObject$ )

       WHEN LEFT$(com$,3) = "eat"
         thisObject$ = RIGHT$(com$, LEN(com$)-4)
         PROC_eatObject( thisObject$ )


       OTHERWISE REM this MUST be the last statement in the case
         
PRINT "I don't understand you!"
         ok% = FALSE


     ENDCASE

     
REM if the user's input was acceptable, then they have
     REM made one 'turn' and should lose one health point
     
IF ok% THEN
       
health% -= 1
     ENDIF

     ENDPROC


DEFPROC_showCurrent
     PRINT "----------------------------------"
     PRINT "You are at the : "World$(x%, y%)
     PRINT "Your health is : "STR$(health%)
     ENDPROC


DEFPROC_showObjects
     REM look for any objects here
     
LOCAL n%
     REM look through list of objects
     
FOR n% = 1 TO numObjects%
       REM is the player's location the same as the object location?
       
IF x% = objectx%(n%) AND y% = objecty%(n%) THEN
         
REM objects is here
         
PRINT "There is "prefix$(n%)" "object$(n%)" here."
       ENDIF
     NEXT
     ENDPROC


DEFPROC_getObject( this$ )
     REM allows player to pick up objects
     
LOCAL n%, found%, index%
     LOCAL objectError$ : objectError$ = "I don't see one of those here!"
     WHILE n% <=numObjects% AND NOT found%
       IF this$ = object$(n%) THEN
         
found% = TRUE
         
index% = n%
       ELSE
         
n% += 1
       ENDIF
     ENDWHILE
     
:
     IF found% THEN
       
REM check that the object is at the player's location
       
IF x% = objectx%(index%) AND y% = objecty%(index%) THEN
         
REM object is here, so pick it up
         
playerObject%(index%) = TRUE REM add to list of player's objects
         
objectx%(index%) = -1 : REM remove object from the grid
         
objecty%(index%) = -1 : REM remove object from the grid
         
PRINT "OK, you take "prefix$(index%)" "object$(index%)
       ELSE
         PRINT 
objectError$
       ENDIF
     ELSE
       PRINT 
objectError$
     ENDIF
     ENDPROC

     
DEFPROC_dropObject( this$ )
     REM allows player to drop objects
     
LOCAL n%, found%, index%
     LOCAL objectError$ : objectError$ = "You are not carrying one of those!"
     WHILE n% <=numObjects% AND NOT found%
       IF this$ = object$(n%) THEN
         
found% = TRUE
         
index% = n%
       ELSE
         
n% += 1
       ENDIF
     ENDWHILE
     
:
     IF found% THEN
       
REM check that the player has the object
       
IF playerObject%(index%) THEN
         
REM player has one so can drop it
         
playerObject%(index%) = FALSE REM remove from list of player's objects
         
objectx%(index%) = x% : REM add object to the grid
         
objecty%(index%) = y% : REM add object to the grid
         
PRINT "OK, you drop "prefix$(index%)" "object$(index%)
       ELSE
         PRINT 
objectError$
       ENDIF
     ELSE
       PRINT 
objectError$
     ENDIF
     ENDPROC


DEFPROC_eatObject( this$ )
     REM allows player to eat objects
     
LOCAL n%, found%, index%
     LOCAL healthBonus% : healthBonus% = 10 : REM health gained from eating things
     
LOCAL objectError$ : objectError$ = "You are not carrying one of those!"
     WHILE n% <=numObjects% AND NOT found%
       IF this$ = object$(n%) THEN
         
found% = TRUE
         
index% = n%
       ELSE
         
n% += 1
       ENDIF
     ENDWHILE
     
:
     IF found% THEN
       
REM check that the player has the object
       
IF playerObject%(index%) THEN
         
REM player has one so can try to eat it
         REM check whether the object is edible
         
IF edible%(index%) THEN
           
REM object is one of the edible objects
           
playerObject%(index%) = FALSE REM remove from list of player's objects
           
objectx%(index%) = -1 : REM remove object from the grid
           
objecty%(index%) = -1 : REM remove object from the grid
           
PRINT "OK, you eat "prefix$(index%)" "object$(index%)
           health% += healthBonus%
           PRINT "You gain "STR$(healthBonus%)" health points!"
         ELSE
           PRINT 
"I'm not eating one of those!"
         ENDIF
       ELSE
         PRINT 
objectError$
       ENDIF
     ELSE
       PRINT 
objectError$
     ENDIF
     ENDPROC


DEFPROC_growApple
     REM if the apple does not exist, then grow a new apple
     
IF objectx%(1) = -1 AND objecty%(1) = -1 AND playerObject%(1) = FALSE THEN
       
appleDelay% -= 1
     ENDIF
     IF 
appleDelay% <= 0 THEN
       
REM reset the apple delay
       
appleDelay% = 10
       REM put the apple in the woods
       
objectx%(1) = 1
       objecty%(1) = 3
     ENDIF
     ENDPROC


DEF FN_convlc(A$)
     REM converts to lower case
     
SYS "CharLowerBuff", !^A$, LEN(A$)
     = A$


     DEFPROC_populateWorld
     REM puts some names of the spaces into the World
     
LOCAL x%, y%
     REM start with the first row
     
FOR y% = 1 TO 3
       FOR x% = 1 TO 3
         READ World$(x%,y%)
       NEXT
     NEXT
     ENDPROC
     
:
     REM the data for our 3x3 grid
     
DATA "Hills",  "Mountains", "Forest"
     
DATA "Castle", "Village", "Fields"
     
DATA "Woods",  "Swamp",  "Lake"

     
DEFPROC_createObjects
     REM puts the names of objects into a list
     
LOCAL n%
     FOR n% = 1 TO numObjects%
       READ prefix$(n%)
       READ object$(n%)
       READ objectx%(n%)
       READ objecty%(n%)
       READ edible%(n%)
     NEXT
     ENDPROC
     DATA
 "an", "apple", 1, 3, -1
     
DATA "a",  "sword", 3, 3, 0
     
DATA "a",  "cake", 2, 2, -1

Label

World Karma Game